PRODUCT DEVELOPMENT · FIT & SIZING
How to Create a Dog Jacket Size Chart: A Guide for Pet Brands
Build a size chart from defined body measurements, then validate the garment through fitting samples. Keep the customer-facing body chart separate from the factory’s finished-garment specification so that ease, adjustment and production tolerances do not become confused.
1. Create two documents: a body chart and a garment specification
The customer needs to know which size fits their dog. The factory needs to know how to measure and reproduce the jacket. These are related tasks, but their numbers need not match.
| Document | What it describes | What to include |
|---|---|---|
| Customer body chart | The intended dog body measurements for each size | Size label, validated body ranges, units, measuring instructions and fit guidance |
| Factory garment specification | The jacket measured in a defined condition | Measurement-point codes, target dimensions, tolerances, closure settings and a revision number |
Ease is the space built into the garment for its intended fit, movement and layers. A tolerance is the agreed manufacturing variation around a target dimension. Neither should be silently added to a customer’s body measurement. State separately whether a published chest figure is a recommended body range, a finished circumference or an adjustment range.
2. Define where and how each measurement is taken
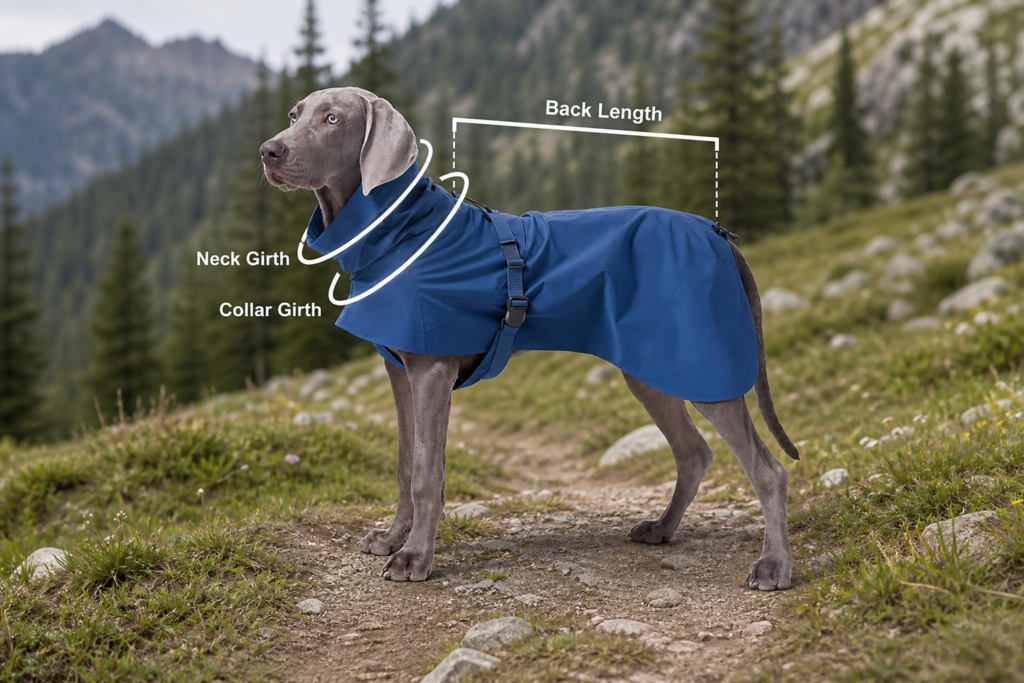
Use a flexible tape while the dog stands naturally. Record back length from the defined neck-base point to the tail base, chest girth around the widest ribcage area, and neck girth at the position specified for the style. Include a sketch or reference photograph showing each starting point. The American Kennel Club’s measuring guide explains these core body measurements and why customers should consult the individual product chart.
For development records, document whether the tape reading includes any allowance. Do not mix a close body reading from one fitting session with an allowance-inclusive reading from another. Otherwise, a pattern correction can be based on inconsistent inputs.
- Back length: specify the body landmark and distinguish it from the jacket’s finished back-panel length.
- Chest: record the body circumference and the location of the garment measurement separately.
- Neck: distinguish the dog’s neck from a collar opening measured with its adjustment released or tightened.
- Additional fit points: record belly coverage, front-leg clearance and harness-access position where relevant to the design.
3. Choose the body shapes and size range you intend to serve
Begin with your target customers, existing fit feedback and available reference samples. Ask whether the collection is intended for one body type, several fit families or a broad adjustable range. Dogs with similar back lengths can have different chest proportions, so one measurement should not be treated as a complete description of the body.
Choose a base size for initial development, then agree how each measurement changes across the range. Avoid assuming that every dimension should increase by the same percentage. A neck opening, belly panel and harness-access position serve different functions and need individual review.
For a small launch, a focused, validated size range may be easier to manage than many untested sizes. Discuss your size mix, pattern requirements and fitting references with the dog jacket pattern-making team before approving the full range.
4. Build a factory measurement sheet with clear conditions
The following is a specification template, not a universal dog size chart. Fill the target values and tolerances after fitting the actual style. Use centimetres as a master unit if that is your agreed working system; if you also publish inches, convert from the approved master values and use consistent rounding.
| Code | Measurement point | Method to agree | Record for each size |
|---|---|---|---|
| A | Finished back length | Defined neckline seam to back hem; state whether collar is excluded | Target and tolerance |
| B | Chest dimension | Defined line, closure position and flat or circumference method | Target, tolerance and closure setting |
| C | Neck opening | Opening measured relaxed, closed or at stated adjustment | Target or validated adjustment range |
| D | Belly-panel length | Defined seam intersection to belly hem | Target and tolerance |
| E | Harness-access position | Distance from a fixed neckline reference point | Position and opening dimensions |
Do not automatically double a flat chest width to obtain circumference when the jacket has overlapping panels, asymmetrical construction or an adjustable belly closure. Explain the measurement method with the garment closed as intended.
Each sheet should carry the style code, size, fabric and lining reference, measurement unit, revision date and approved-sample reference. This gives the sampling and inspection teams a common document.
5. Validate fit in the intended materials before bulk approval
Record the fitting dog’s body dimensions alongside the sample measurements. Check the actual material combination: changing stretch, lining or insulation can change how a jacket fits even when the flat pattern looks similar. For weatherproof designs, coordinate fit decisions with the construction checks in our waterproof dog jacket OEM guide.
Use a consistent review sequence, supported by front, side, back and underside photographs:
- Standing fit: check coverage, closure overlap, neck comfort and clearance around the front legs.
- Movement: observe normal walking, sitting, turning and head lowering for pulling, shifting or contact at the leg openings.
- Functional use: check access to the intended harness and whether the belly panel allows normal toileting.
- Adjustment: confirm the usable settings without loose parts or inadequate closure engagement.
- Range validation: review each size before approval, paying particular attention to the smallest and largest sizes and any different fit blocks.
- Care review: where washing is part of the intended care routine, agree the procedure and assess fit and dimensions afterwards.
Write each correction as a specific change to a measurement point or pattern feature. Keep the approved version with the sample record so that a later revision cannot be mistaken for the production reference. Our pet apparel sampling checklist covers the wider development brief.
6. Publish customer instructions that match the approved product
Label the online chart clearly as body measurements or garment dimensions. Show the unit beside the values, explain how to take the measurements and state which dimension guides size selection for that particular style. If two measurements suggest different sizes, give a tested recommendation or offer fitting assistance.
Avoid using a breed name or body weight as the only sizing instruction. They can provide context, but they do not replace measurements. Likewise, do not copy another brand’s chart and assume its numbers will fit your pattern.
Before launch, check that the size labels on the website, packaging, garment labels and purchase order refer to the same approved chart. Keep a revision history when the pattern or size range changes.
Frequently asked questions
Is there a universal dog jacket size chart?
No single chart should be assumed to fit every brand or style. Develop and validate the chart against the product’s pattern, material, adjustments and intended body shapes.
Should the online chart show body or garment measurements?
Choose a clearly labelled system. A body chart helps customers match their dog to a size; garment dimensions describe the finished product. If you provide both, keep them in separate tables with measuring instructions.
How much extra room should a dog jacket have?
There is no single allowance suitable for every jacket. Determine ease through fitting in the intended materials, considering movement, layering, coverage and the adjustment system.
Can one pattern serve every breed?
Do not assume it can. Validate the target body shapes and consider separate fit blocks when adjustment alone cannot deliver the intended coverage and movement.
What should a brand send before requesting a sizing sample?
Send the target body measurements, reference images or a physical sample, intended size range, material direction and fit priorities. Add a measurement sketch and existing customer fit feedback when available.